Sprint 12 - September 22, 2021
- Feature
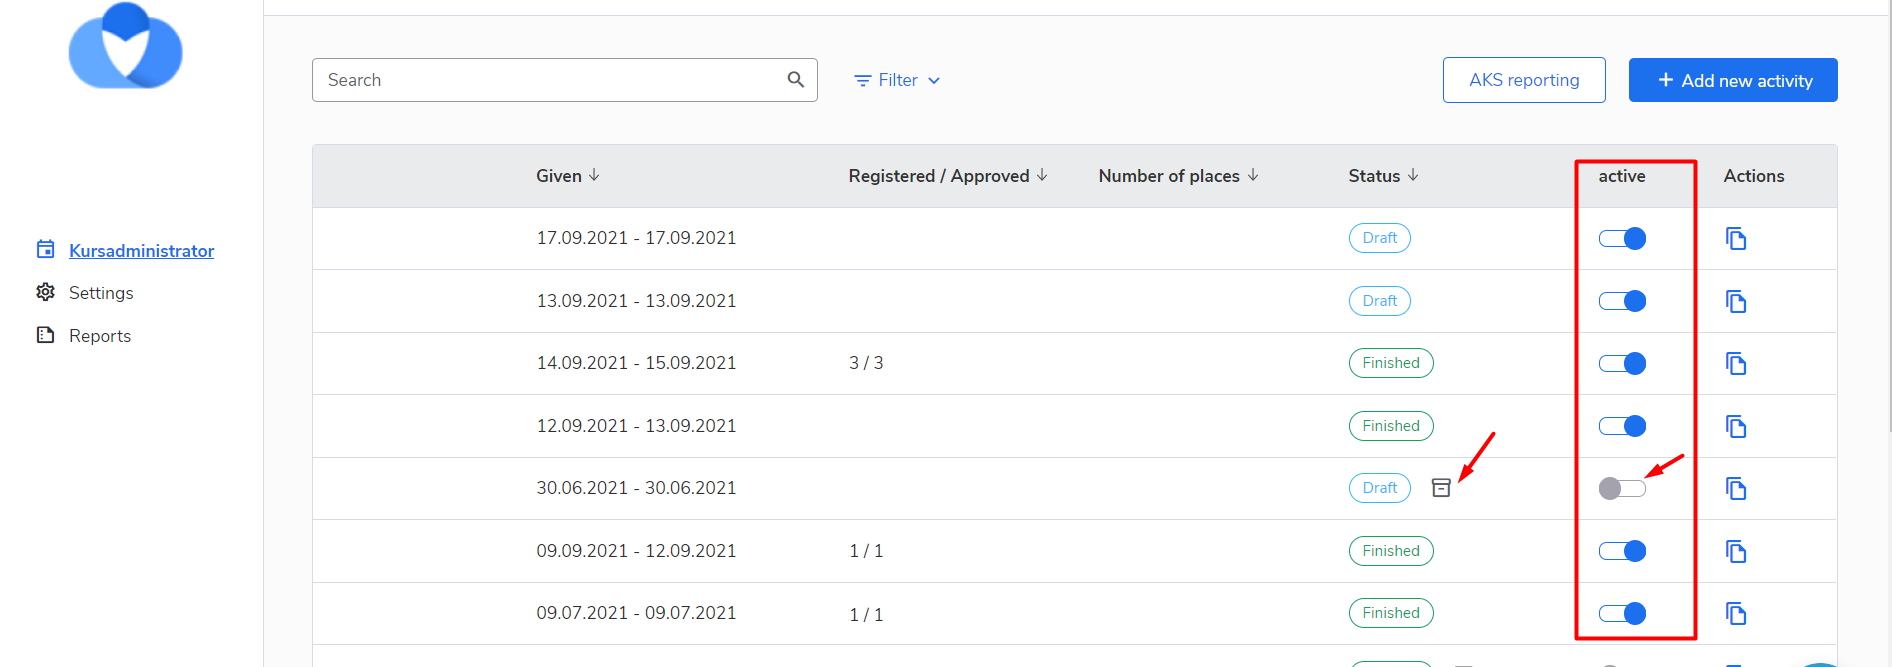
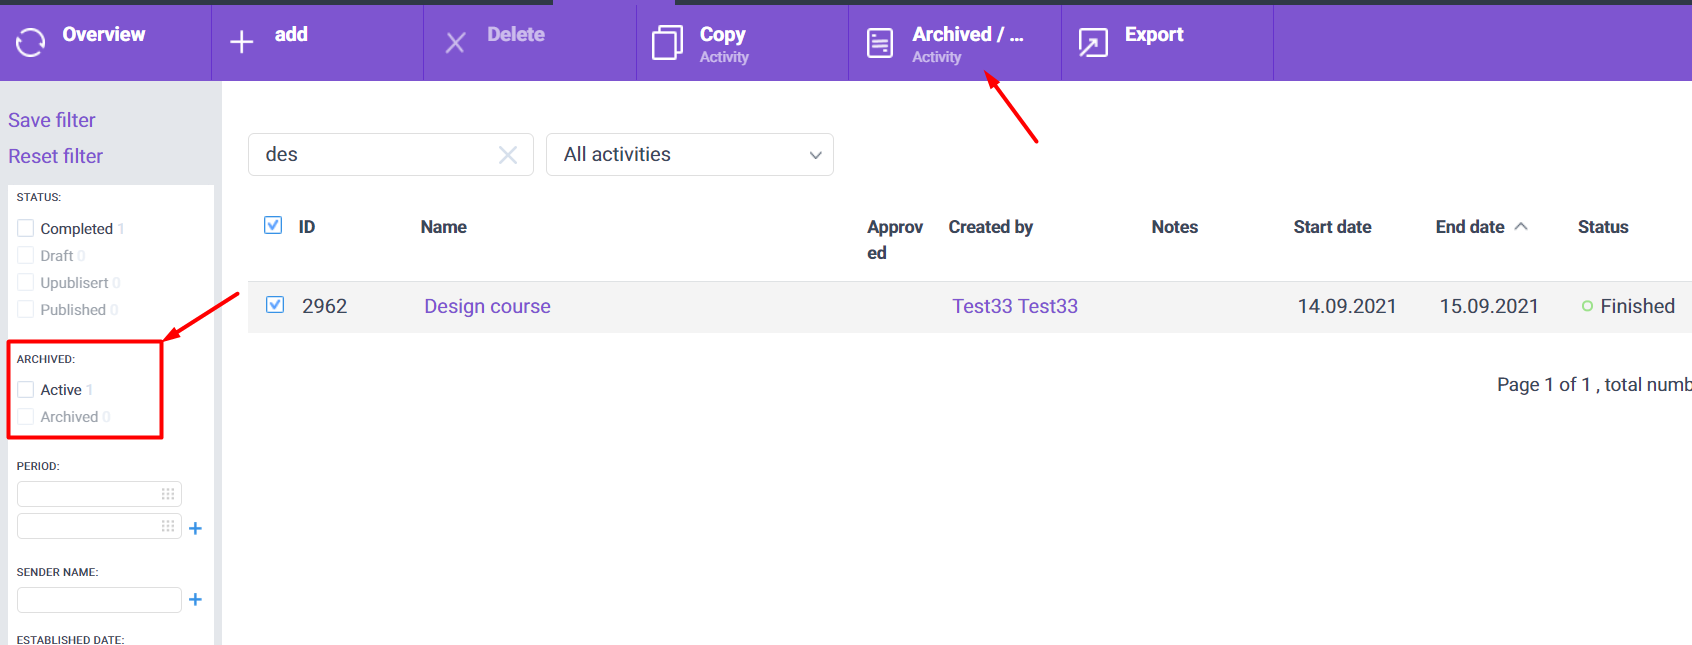
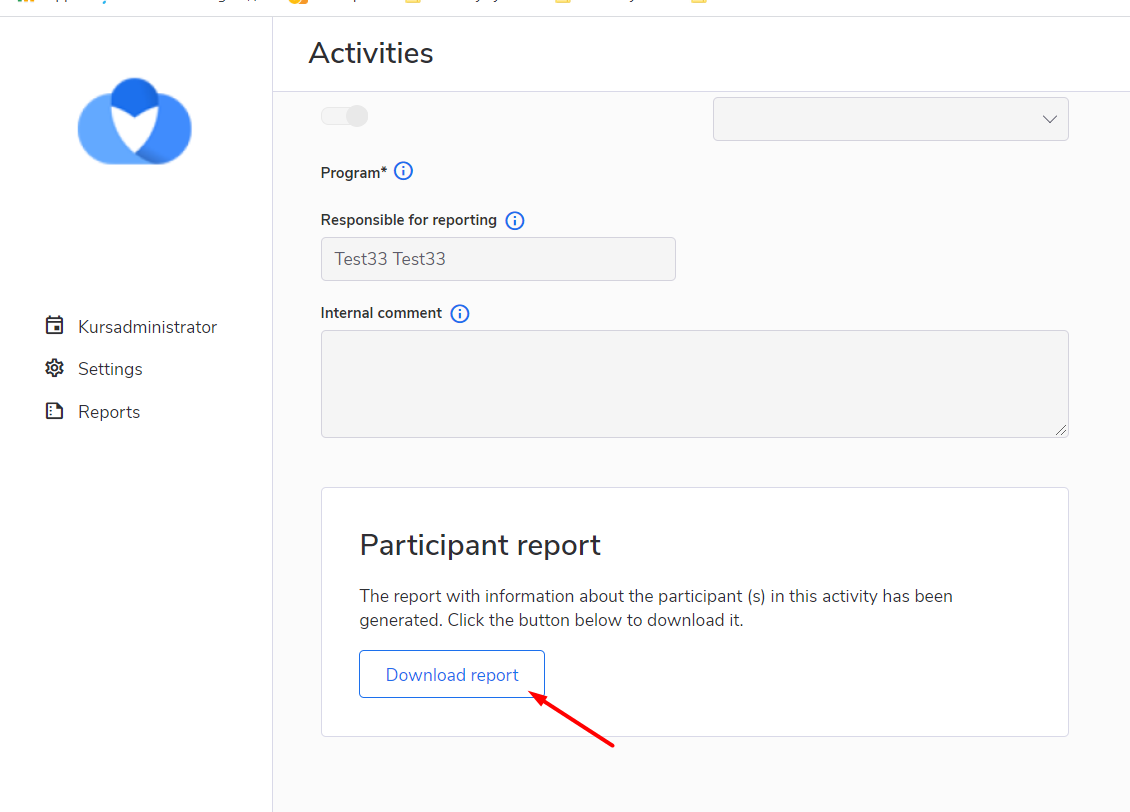
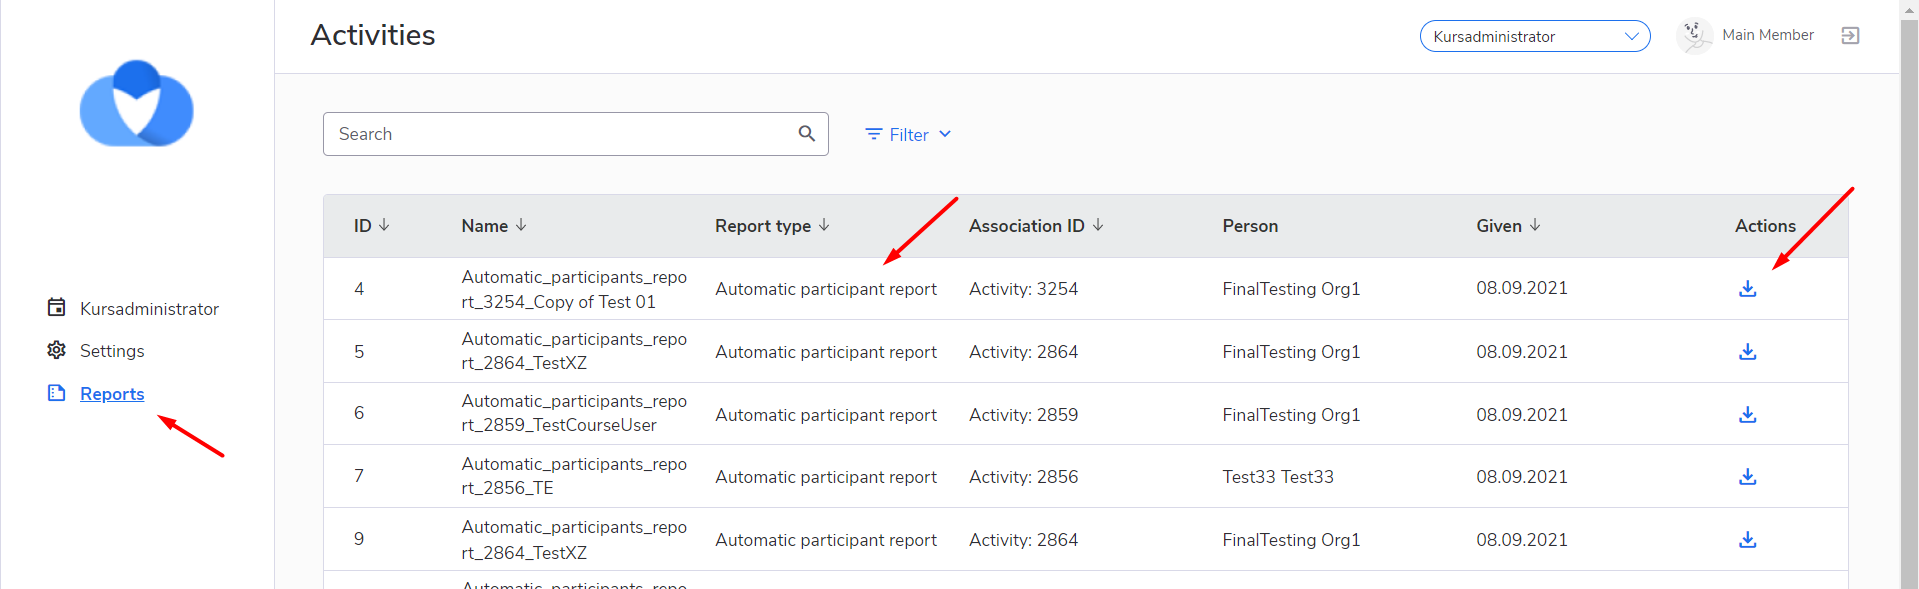
Added new condition for the courses – “Archived”. The transfer of the course to this state can only be done manually, by System Course Super Admin, Course Super Admin, Editor, Back-Office Admin. After the course transitions to the “Archived” state, the system generates an automatic report on course participants. The functionality for automatic reporting with course participants will only work if the organization has the special course report feature enabled. This report includes information about course participants having “Finished” status. Also, after transferring the course to the “Archived” state, all automatic operations are terminated, and the course information becomes inaccessible for editing. However, the administrator still has the opportunity to return the course to an active state, after which the information will again be available for editing. If you decide to move the course to an “Archived” state, then to make it “Active”, and after that, you move the course to “Archived” again, the system will generate a new report. The latest version of the report can be downloaded from the “Settings” tab in the course card. Or you can find all the versions that were generated in the “Reports” page. In the list, there it will be named as “Automatic course report”
How to change the course condition into “Archived”:
1. Go to Back-Office as a Back-Office admin
2. Visit the “Activity” page
3. Choose the course and enter to it
4. Click on the “Archive” button on the top bar
5. Save the changes
OR
1. Go to Front-Office as a System Course Super Admin/Course Super Admin/Editor
2. Visit the activity list page and find the course that you need
3. Switch Off the toggle in the “Active” column toggle
4. Save the changes
How to download the generated report
1. Go to the Front-page as a System Course Super Admin, Course Super Admin, Editor
2. Go to the list of the courses and find the report with the “Archived” condition
3. Go into the course card, in the “Setting” tab
4. Scroll to the “Participants report” block and download the report
OR
1. Go to the Front-page as a System Course Super Admin, Course Super Admin
2a. Go to the “Reports” page
3a. Filter the list of the reports by the course_id, report_id, or name of the report and find the reports that were generated for your course.
4а Press the “Download” for downloading the reports that you need
- Feature
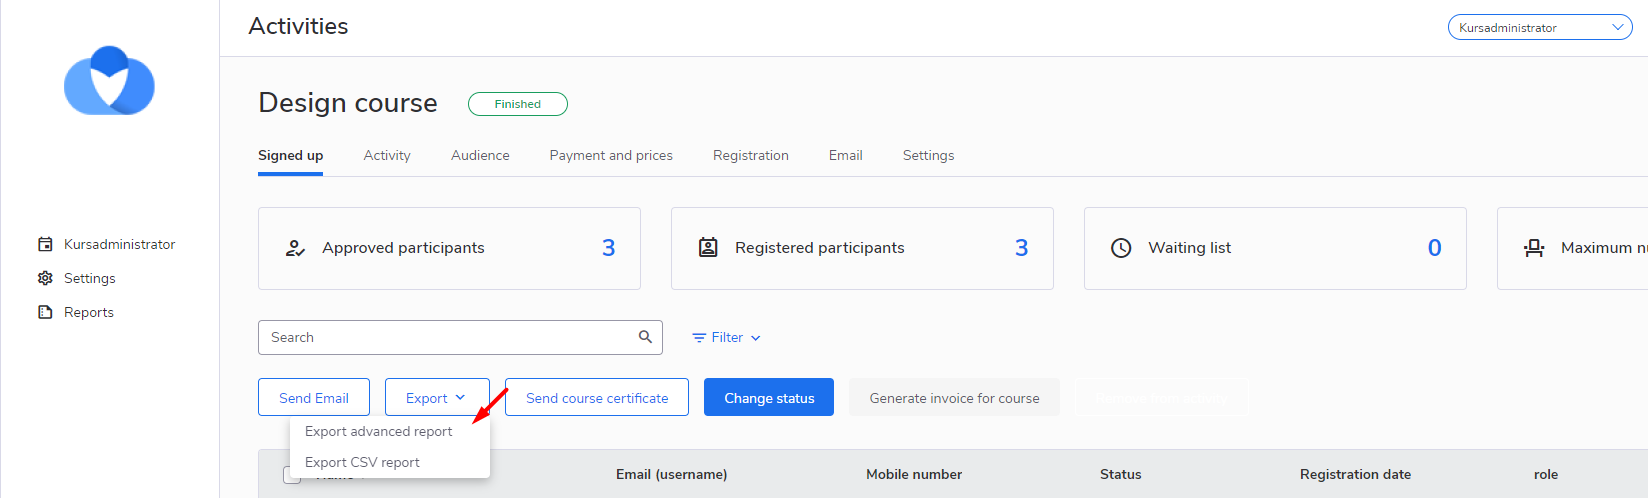
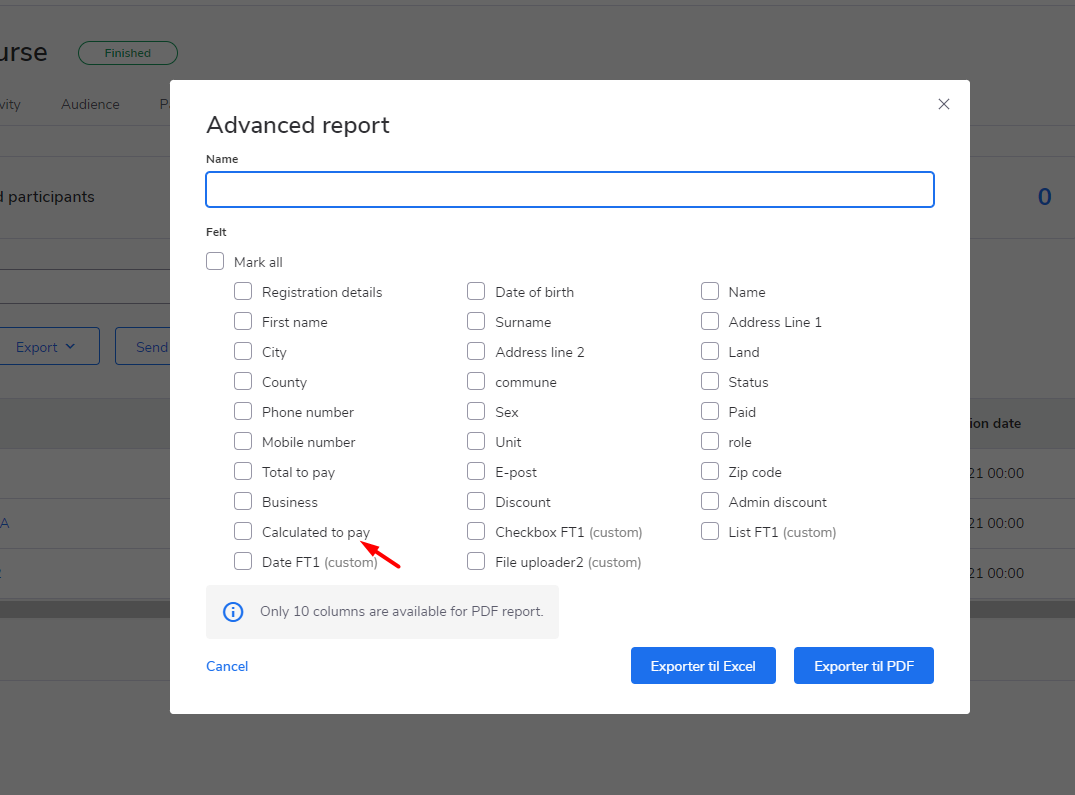
We added a new column “Calculated to pay” into the pop-up form with the list of suggested columns for advanced course report generation. This column predicts the sum which course participants will have to pay(before the invoices will be generated to the participants) according to the sum of the selected products, by the participant, on the course for the participant.
How to use:
– Go to the course card on the My Page, as a Course administrator
– Click on the “Export” button and then click on the “Export advanced report”
– Choose the values(columns) that you want to see in your report, including the “Calculated to pay” value
– Download the report by pressing the “Export Excel” or “Export PDF” button
- Feature
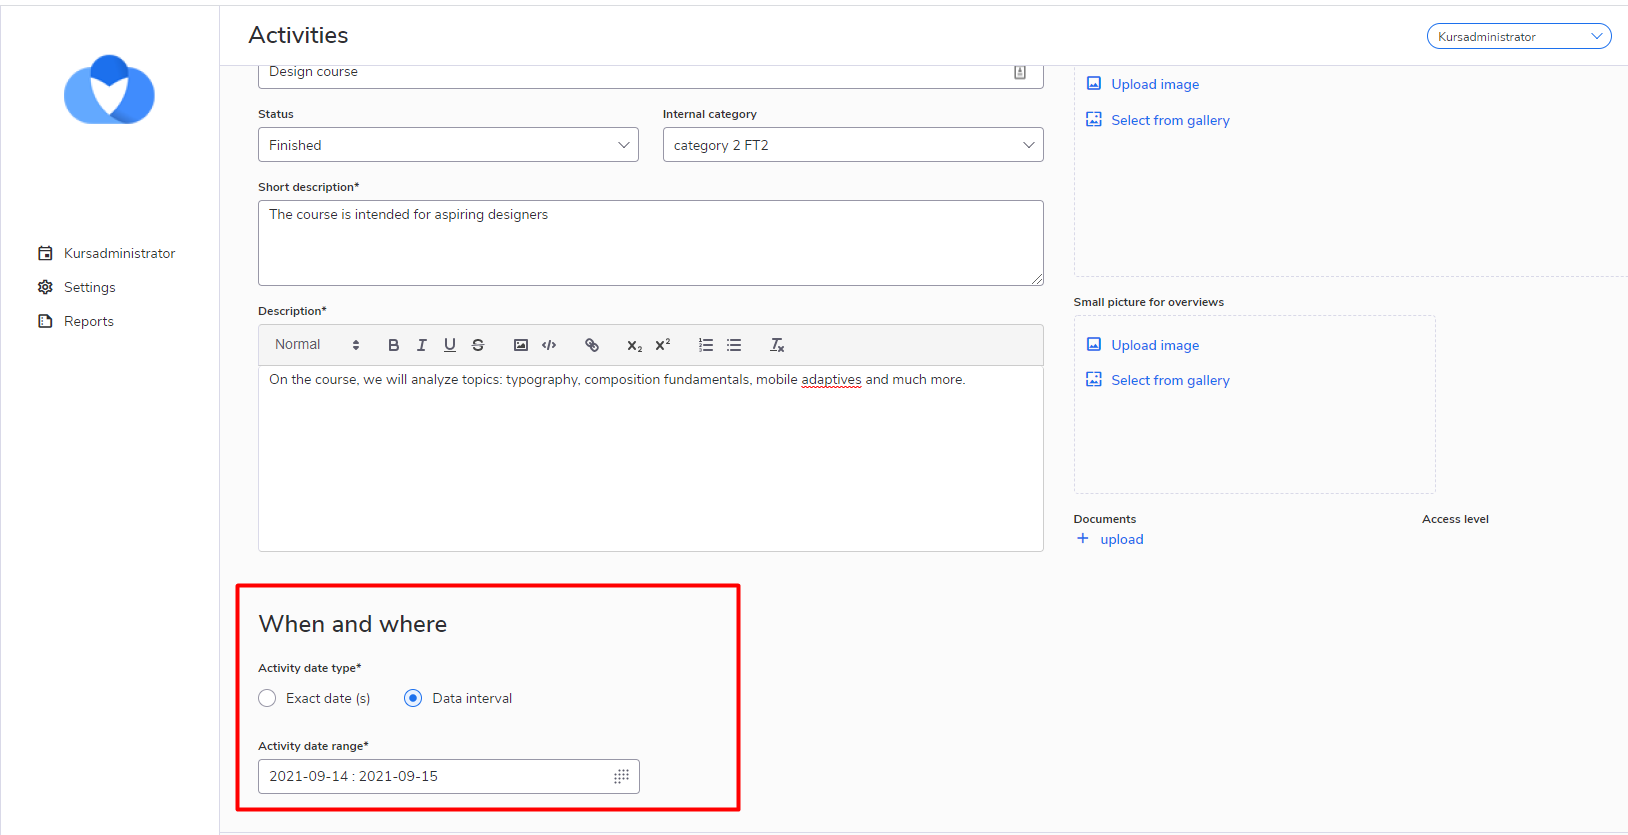
Now, if you’re creating or created an offline course on the My Page, you can set for it a data interval instead of setting the particular date(s) of when the course will take place. If you apply this option, on the course card and registration form, the system will display a selected data interval instead of a particular date(s)
How to use:
1. Go to the Front Page as a Course Admin
2. Start to create the course and at the pop-up form choose the “Physical attendance” option and confirm the course creation
3. On the “Activity” tab, in the “When and Where” block click on the “Data interval” radio-button
4. Select the data interval that you need for the course
5 Press the “Apply” button at the bottom of the page
OR
2a Find a created offline course in the list of courses
3а Then go to the “Activity” tab and choose the date interval option instead of the particular date option
4. Select the date interval that you need for the course
5 Press the “Apply” button at the bottom of the page
Important: This option can only be set on My Page, it is not available in the Back Office. If you have selected the data interval option for the course, then to change it to the format of a specific date, you need to change the setting in the “Activity” tab of the course, on My Page
- Feature
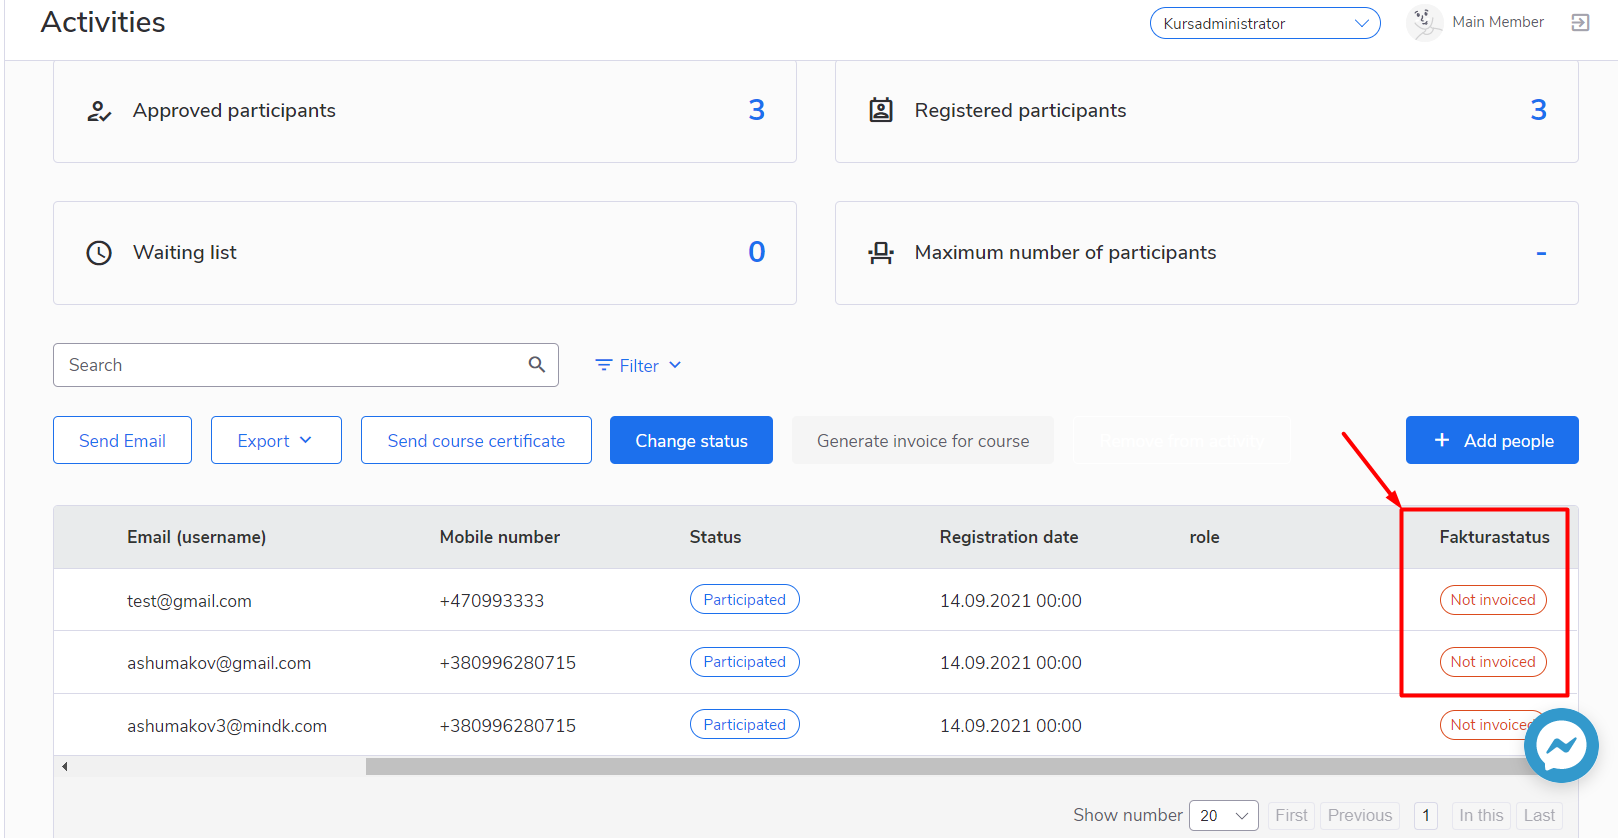
We added “Credited” status for the “Status invoice” column, in the participant list in the Course card. This status will be displayed in the column if the course invoice was credited. Also, we change the name of the “Is invoiced” column into “Status invoice” and now, in this column, you can 3 possible statuses: if the participant doesn’t have any invoices for the course his/her status invoice will be “Not Invoiced”, if he/she has, at least one invoice for the course which wasn’t credited, the invoice status will be “Invoiced”, if he/she has all invoices credited for the course, the status will be “Credited”.
Important to know: If a participant, for example, has 2 invoices for the course, and of them were credited, the status will be displayed as “Invoiced”, because he/she still has one valid invoiced that’s needed to be paid. In the case, if he/she will get the second invoice credited too, the status will be displayed as “Credited”, because all the invoices that he/she has for the course were credited.
How to use:
– Go to the My Page as a System Course Super Admin, Course Super Admin, Editor, Contributor OR to the Back-Office as Back-Office Admin
– Go to the Activity list and find the course that you need
– Go participants list and see the invoices statuses for each participant
- Feature
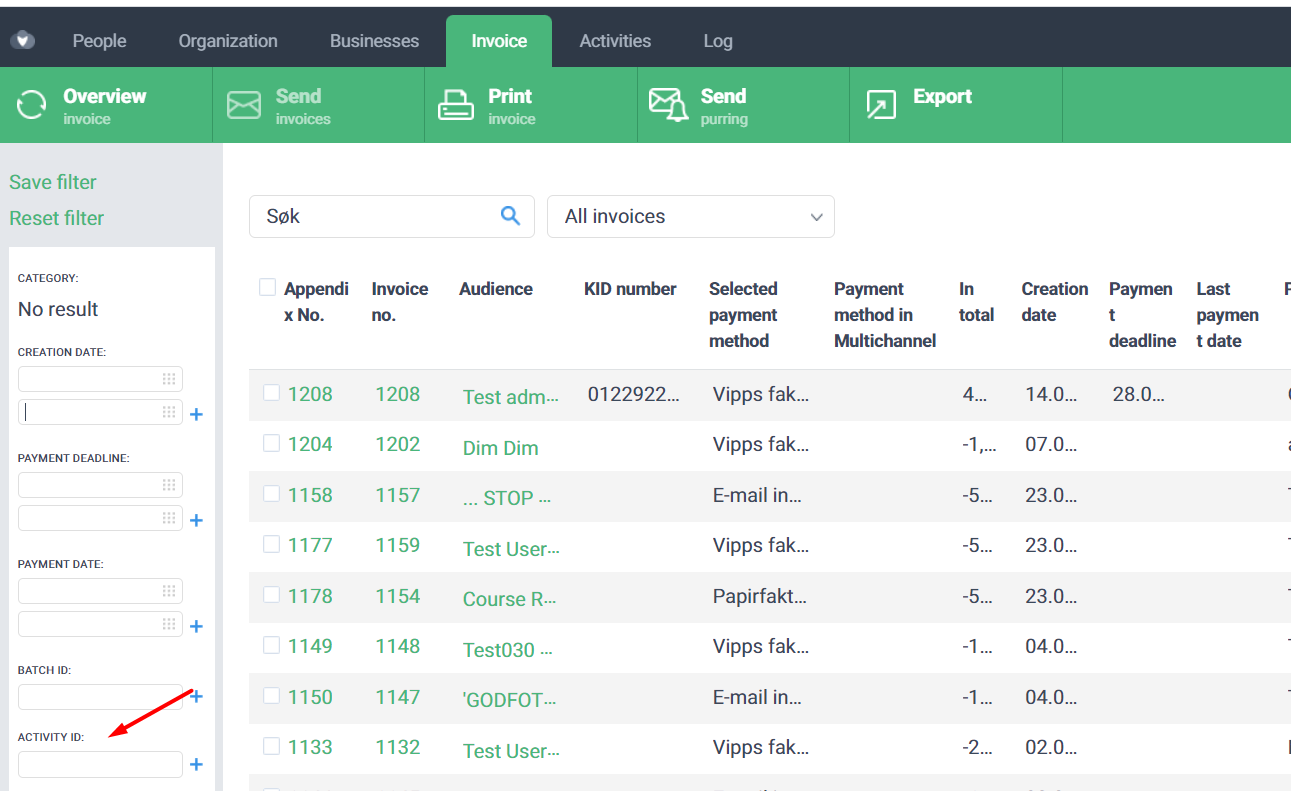
We added a new filter – “Activity_id” for the invoices list. This filter allows the user to find the invoices that were generated for the certain course
How to use:
– Go to the Back-Office as a Back-Office admin
– Go to the “Invoices” tab
– Find the “Activity_id” filter in the side-bar
– Enter a correct id of the particular course and press “+” button
- Feature
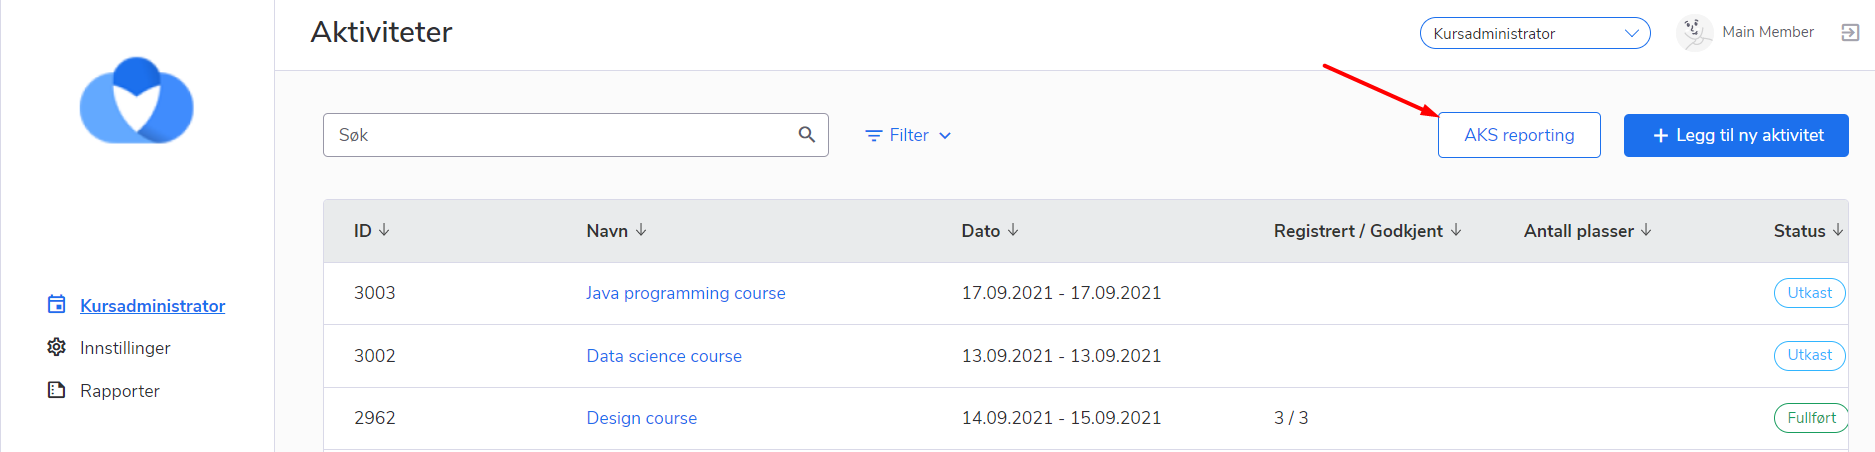
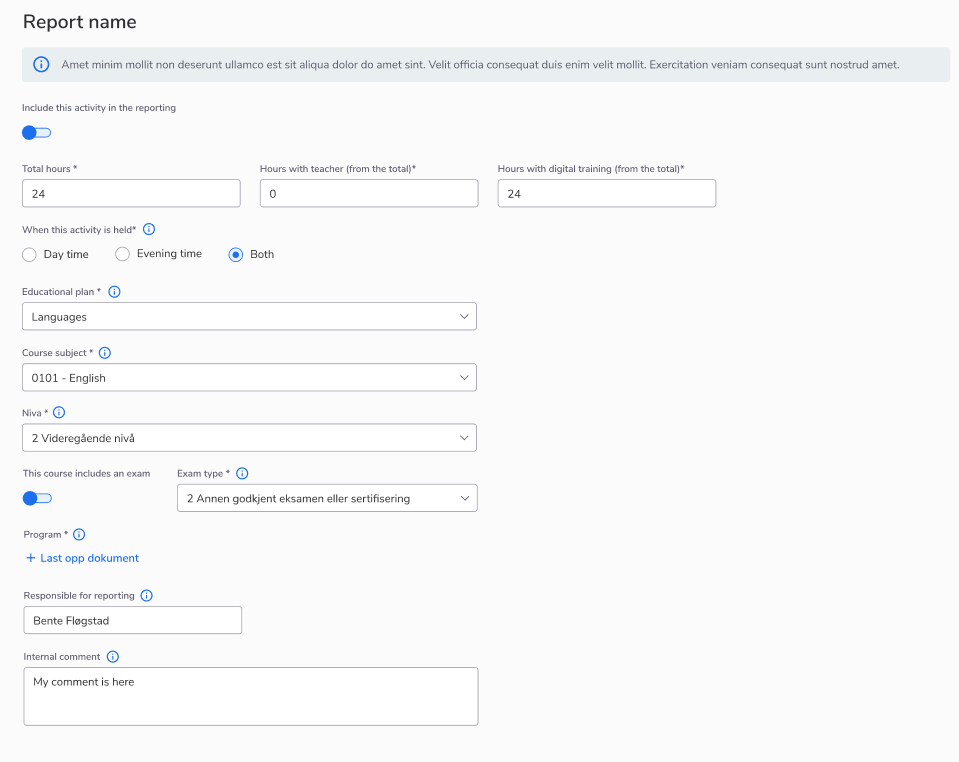
We’ve finished the feature with special course reporting. This feature will allow organizations that conduct educational courses to receive funding from the Norwegian government by submitting a special report to the appropriate proxy organization. This feature will be available only to those organizations that have submitted a request to enable this functionality.
The report will contain the following information:
– ID of the organization that sends the report and receives
– course ID
– course subject
– course contact information
– number of participants per course and their distribution by age and gender
– course start date
– amount of hours spent on online studies and learning with a teacher
– date of publication of the course
How to get your course included in the special report:
1. Be sure that this feature is enabled in your organization
2. Go to My Page as a System Course Super Admin/Course Super Admin/Course Admin/Course Editor
3. Find the course that you need in the activities list
4. Go to the “Setting” tab of the course
5. Find a block with the toggle “Include this activity in the reporting”(see the screen below)
6. Fill the mandatory fields
7. Apply the entered information by clicking the “Apply” button at the Buttom the Page
In order to generate the special report, you have to:
1. Go to My Page as a System Course Super Admin/Course Super Admin/Course Admin/Course Editor
2. Go to the list of the Activities
3. Press the special report button
4. Select the time period and apply it
You will receive a file with a report, which will display all courses for which the toggle “Include this activity in the reporting” was enabled and the start date of which falls within the period that you specified when generating the report